HP OfficeJet 3830, DeskJet 3830, 5730 Printers - First Time Printer Setup
HP OfficeJet 3830, DeskJet 3830, 5730 Printers - First Time Printer Setup
This document is for HP OfficeJet 3830, 3831, 3832, 3833, 3834, 3835, DeskJet Ink Advantage 3835, 3836, 3838, DeskJet Ink Advantage Ultra 5738, 5739 All-in-One printers.
To set up a printer for the first time, remove all packing materials, connect the power cable, install the ink cartridges, and then load paper into the input tray.
NOTE:If you are looking for the printer software, go to:
Step 1: Unpack the printer from the box
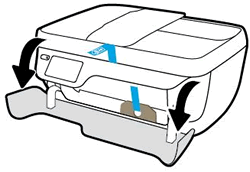
Remove the printer from the box, and then remove all tape, stickers, and packing materials from the printer.
-
Remove the printer from the box.
-
Remove all tape and packing materials from the outside of the printer, and then open the exterior door.Figure : Remove the tape, and then open the exterior door
-
Remove the tape and packing material from under the ink cartridge access door.Figure : Remove the tape and packing material from under the ink cartridge access door

-
Open the ink cartridge access door, and then remove the tape and packing materials from inside the printer.Figure : Remove the tape and packing materials from inside the printer

-
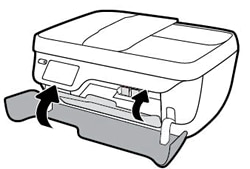
Close the ink cartridge access door, and then close the exterior door.Figure : Close the ink cartridge access door, and then close the exterior door
Step 2: Connect the power cord, and then set the language, country/region, time, and date
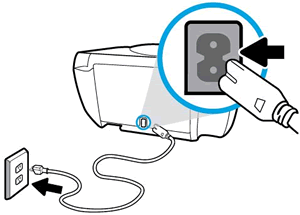
Connect the power cord, turn on the printer, and then enter your localization settings.
-
Connect the power cord to the rear of the printer, and then plug the other end of the power cord into an electrical outlet.Figure : Connect the power cord
-
Press the Power button to turn the printer on.Figure : Press the Power button
 On the printer control panel, the Language menu displays.Figure : Select your language
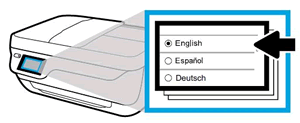
-
Touch your preferred language, and then touch Yes to confirm your choice.The Country/Region menu displays.
-
Touch your specific country/region, and then touch Yes to confirm your choice.The Date/Time menu displays.
-
Select the date, and then touch Next.
-
Select the time, and then touch Done.
Step 3: Install the ink cartridges
Install the HP ink cartridges that shipped in the box with your printer.
-
Open the exterior door, and then the ink cartridge door.The printer carriage moves to the center of the printer.Figure : The printer carriage moves to the center of the printer

-
Wait until the printer is idle and silent before you continue.
-
Remove one of the ink cartridges from its package. Be careful to touch only the black plastic on the ink cartridge.
-
Remove the protective tape.
CAUTION:
Do not touch the copper-colored contacts or the ink nozzles. Do not replace the protective tape on the contacts. Handling these parts can result in clogs, ink failure, and bad electrical connections.Figure : Remove the tape and avoid touching the ink cartridge contacts or ink nozzles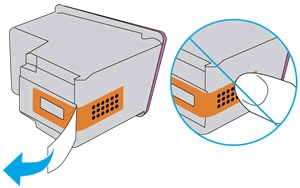
-
Slide the new ink cartridge at a slight upward angle into the empty slot, and then gently push up on the ink cartridge until it snaps into place.
-
Insert the tri-color ink cartridge (
 ) into the left slot.
 -
Insert the black ink cartridge (
 ) into the right slot.
Figure : Insert the new ink cartridge
-
-
Repeat these steps to install the other ink cartridge.
-
Close the ink cartridge access door, and then close the exterior door.Figure : Close the ink cartridge access door
Step 4: Load paper into the input tray
Load plain white paper in the input tray after you unpack the printer from the box.
-
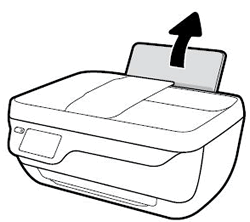
Raise the input tray.Figure : Raise the input tray
-
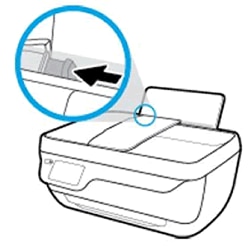
Slide the paper width guide all the way to the left.Figure : Slide the paper width guide left
-
Load plain white paper into the input tray, and then slide the stack of paper down until it stops.Figure : Load plain white paper

-
Slide the paper width guide to the right until it stops at the edge of the paper.Do not push the paper width guide so far that it binds the paper.Figure : Slide the paper width guide right

-
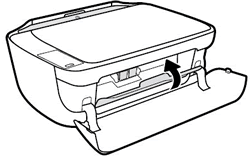
Pull out the output tray, and then raise the tray extender.Figure : Pull out the output tray, and then raise the tray extender

Step 5: Align the ink cartridges
Aligning the ink cartridges is necessary to achieve the best print quality.
-
After loading the paper, touch OK, and then the printer automatically prints an alignment page.
NOTE:
The printer only prints an alignment page automatically when new ink cartridges are installed. -
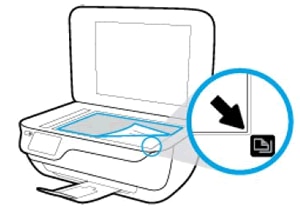
Lift the scanner lid.
-
Place the alignment page with the print side down on the scanner glass, and then position it according to the engraved guides around the glass.Figure : Place the alignment page on the scanner glass
-
Close the scanner lid.
-
Touch OK to scan the page and complete the ink cartridge alignment.
Step 6: Install the printer software
Your HP printer hardware is now set up and you can install the printing software. Do not attempt to connect the printer to a computer until instructed to do so in the printing software.
Download the latest version of the printing software from the following HP websites:
-
Printer software for HP DeskJet 3830 printers: http://123.hp.com/DJ3830
-
Printer software for the HP OfficeJet 3830 printers: http://123.hp.com/OJ3830
-
Printer software for the HP DeskJet Ink Advantage Ultra 5730 printers: http://123.hp.com/DJ5730
https://support.hp.com/us-en/document/c04638137

Comments
Post a Comment