HP OfficeJet 3830, DeskJet 3830, 5730 Printers - Loading Paper and Envelopes
HP OfficeJet 3830, DeskJet 3830, 5730 Printers - Loading Paper and Envelopes
This document is for the HP Deskjet 3830, 3831, 3832, 3833, 3834, 3835 and Deskjet Ink Advantage 3835, 3836, 3838 and DeskJet Ink Advantage Ultra 5738, 5739 All-in-One PrinterAll-in-One printers.
This document provides instructions for loading plain paper, photo paper, and envelopes into the printer.
NOTE:To purchase paper in the United States and Canada, go to the HP Store.
Loading plain paper
Load plain paper into the printer for basic printing tasks.
-
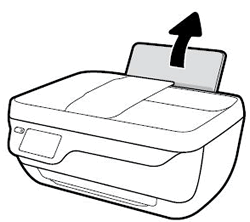
Raise the input tray.Figure : Raise the input tray
-
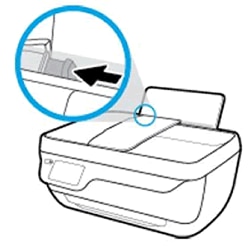
Slide the paper width guide all the way to the left.Figure : Slide the paper width guide left
-
Load plain white paper into the input tray, and then slide the stack of paper down until it stops.Figure : Load plain white paper

-
Slide the paper width guide to the right until it stops at the edge of the paper.Do not push the paper width guide so far that it binds the paper.Figure : Slide the paper width guide right

-
Pull out the output tray, and then raise the tray extender.Figure : Pull out the output tray, and then raise the tray extender

Loading photo paper
Load photo paper into the printer to print high-quality photographs.
-
Raise the input tray.Figure : Raise the input tray
-
Slide the paper width guide all the way to the left.Figure : Slide the paper width guide left
-
Load a stack of photo paper into the input tray with the short edge down and the print side up.Slide the stack of photo paper in until it stops.
NOTE:
If the photo paper you use has perforated tabs, load the photo paper so that the tabs are on top.Figure : Load photo paper
-
Slide the paper width guide to the right until it stops at the edge of the photo paper.
NOTE:
Do not leave any photo paper in the input tray after you finish printing, as the quality of the paper might deteriorate. Store photo paper in a sealed bag in a cool, dark place.Figure : Slide the paper width guide right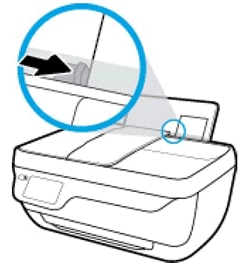
-
Pull out the output tray, and then lift the tray extender.Figure : Pull out the output tray, and then lift the tray extender
Loading envelopes
Load the printer with blank envelopes to print addresses for the recipient and the sender.
NOTE:You can load one or more envelopes in the tray, but do not load more than five envelopes at a time. Do not use shiny or embossed envelopes or envelopes that have clasps or windows.
-
Raise the input tray.Figure : Raise the input tray
-
Slide the paper width guide all the way to the left.Figure : Slide the paper width guide left
-
Load one or more envelopes into the far-right side of the input tray. Make sure that the side to be printed on faces up, and the side with the flap is on the left, facing the input tray.Figure : Load envelopes
-
Slide the paper width guide to the right until it stops at the edge of the envelopes.Figure : Slide the paper width guide right
-
Pull out the output tray, and then lift the tray extender.Figure : Pull out the output tray, and then lift the tray extender

Comments
Post a Comment